☁️ Hosted MCP Server
Bluente’s hosted MCP server lives at https://mcp.bluente.com/. You connect with a URL and sign in with your Bluente account — no Node.js, no install, no API key. This is the right choice for every client except ChatGPT, which has its own page.
New to Bluente MCP? The overview covers what the tools do, what the settings mean, and how billing works. This page is setup only.
https://mcp.bluente.com/No client ID and no client secret — leave those fields blank. Clients discover everything they need from the URL.
Using a coding agent? Claude Code, Codex, Cursor and friends set up a little differently — jump straight to their section.
Claude (web & desktop)
Custom connectors require a paid Claude plan. On a free plan you cannot add one.
- Open Settings → Connectors → Add custom connector.
- Enter
https://mcp.bluente.com/and choose Connect. - Complete the Bluente login in the browser window that opens.
On Team/Enterprise plans, an admin may need to add the connector organization-wide.
Adding the connector does not switch it on by itself: in each conversation, open the tools menu in the composer and make sure Bluente is enabled, or Claude will not see the translation tools.
Two settings you must turn on
Claude needs two settings enabled before it can send your files to Bluente. A file you attach lands in Claude’s code-execution sandbox, which can’t reach mcp.bluente.com until you allow it.
Both live under Settings → Capabilities.
1. Turn on code execution
Under Code execution and file creation, enable Cloud code execution and file creation.

Settings → Capabilities → Code execution and file creation.
2. Turn on network egress and allow mcp.bluente.com
On the same page, enable Allow network egress. Then, under Domain allowlist → Additional allowed domains, type mcp.bluente.com and press Add.
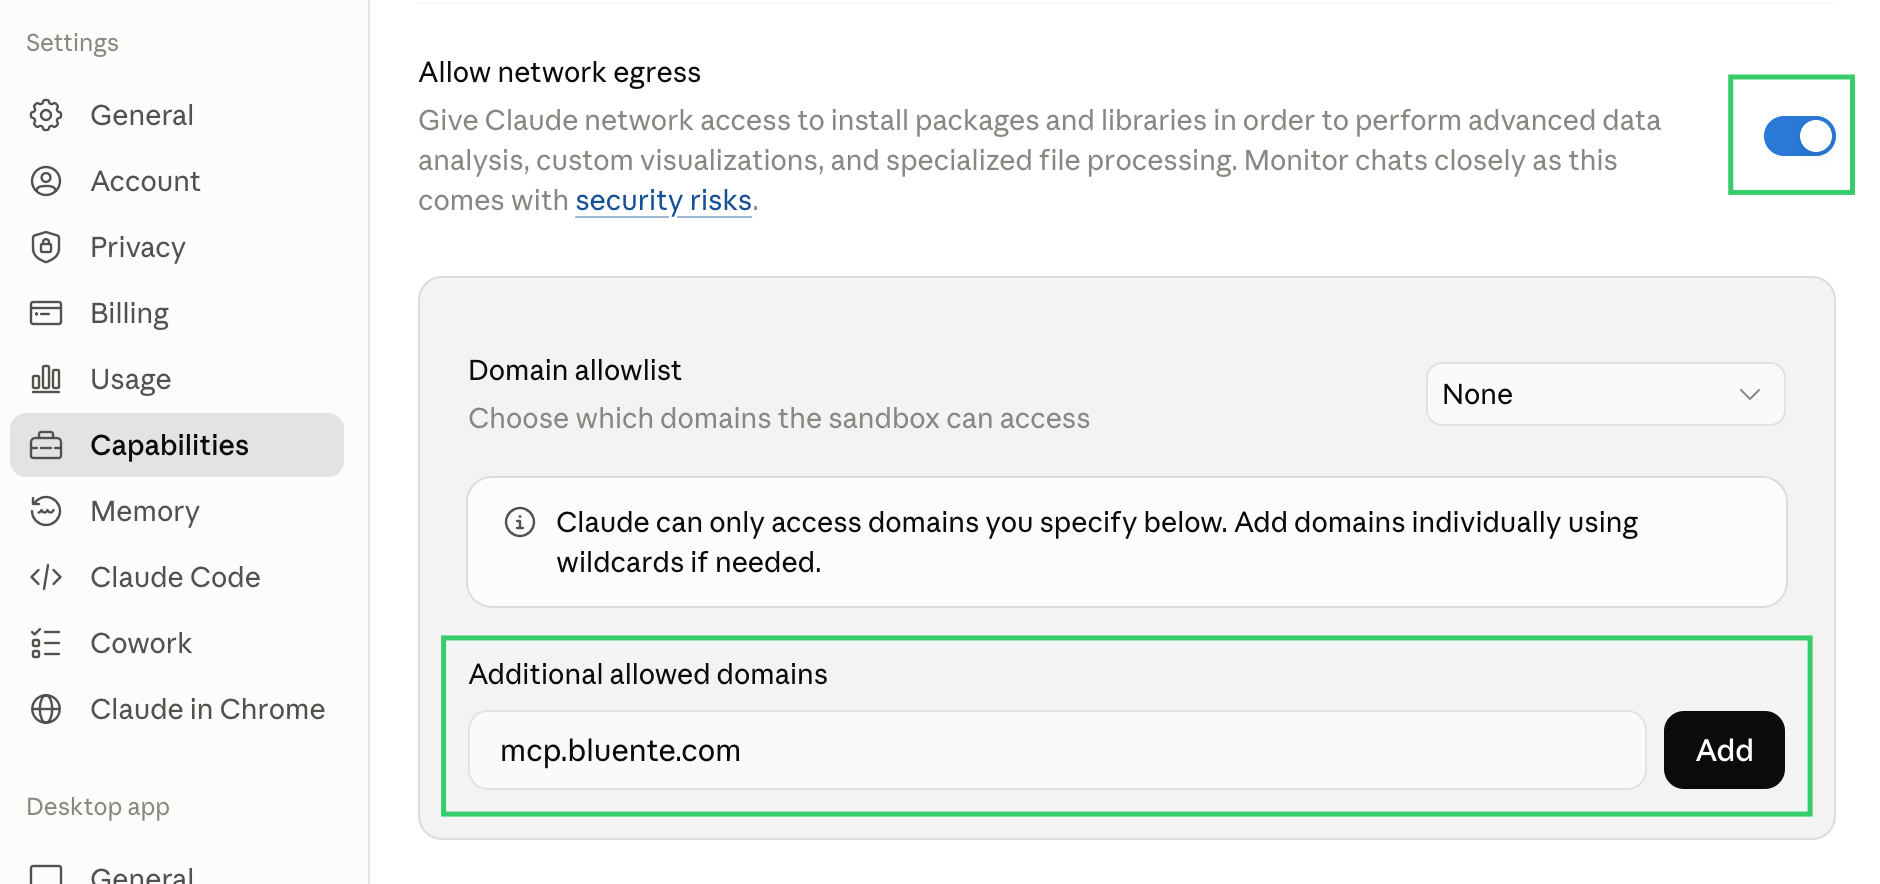
Enable Allow network egress, then add mcp.bluente.com to the domain allowlist.
On Team or Enterprise plans these may be locked to your organization — an admin sets them under Organization settings → Capabilities, including adding mcp.bluente.com to the allowed network domains.
If you cannot enable egress, small files (under 2MB) still work through an inline fallback, and you can always give Claude a publicly accessible file URL instead.
What you’ll see
Attach the file → Claude shows a confirmation card with the page count and settings → you confirm (or adjust the language, format, mode, or page range) → download link(s), valid 15 minutes. Nothing is charged until you confirm. See Settings you’ll be asked about for what you can change.
Coding agents (Claude Code, Codex, and friends)
Both connect to the same URL over streamable HTTP and both complete the login in a browser. Cursor, Windsurf, Zed and other MCP clients that accept a remote HTTP server work the same way — point them at the URL and authenticate.
Option 1: Let your agent do it
The fastest way to install: don’t. Paste this into Claude Code, Codex, or any coding agent that can edit its own MCP config, and it will do the rest:
Read https://www.bluente.com/docs/mcp/hosted.md and install this MCP server for me.The OAuth step is the one thing the agent cannot finish alone — a browser window has to open and you have to sign in. Everything either side of that it can handle.
Option 2: Manual install
1. Add the server
Claude Code
claude mcp add --transport http bluente-translate https://mcp.bluente.com/Add --scope user to enable it in all your projects instead of just this one.
Codex
codex mcp add bluente-translate --url https://mcp.bluente.com/Codex detects OAuth support and starts the login flow immediately, so for Codex step 2 is already done. It stores the entry in ~/.codex/config.toml, where the equivalent by hand is:
[mcp_servers.bluente-translate]
url = "https://mcp.bluente.com/"
2. Sign in
Claude Code — run /mcp, pick bluente-translate, and choose Authenticate. A browser window opens for the Bluente login.
Codex — already done by codex mcp add. If you ever need to re-authenticate, run codex mcp login bluente-translate.
3. Check it worked
Ask your agent “What languages does Bluente translation support?” — a free, read-only call. A language list back means you’re connected.
The hosted server has no filesystem, so it cannot open a file by path. Claude Code uploads local files for you automatically; other clients may want a publicly accessible URL instead. If you translate local files constantly and would rather the server read and write them directly on disk, the open-source local stdio server does that — it takes an API key instead of OAuth.
Troubleshooting
- You’re asked to log in again after a while. Expected. The server’s discovery document advertises
authorization_codeonly — no refresh tokens are issued, so every client eventually asks you to re-authenticate rather than renewing in the background. Just log in again; your credits and translation history are unaffected. - The authorize page says “Third-party application” or “redirect destination is not registered”. Connectors added before 27 August 2026 may have cached an old client registration. Remove the connector and add it again.
- Download link expired. Links are valid for 15 minutes. Ask for a fresh link in chat — it costs nothing and doesn’t re-translate the document.
- A scanned PDF came back with blank or missing pages. It was probably translated as a standard document. Ask for it again as scanned (text) or scanned (overlay).
- Translation won’t start, or fails right after you confirm. Most often an empty credit balance — the confirmation gate does not check it, so the error surfaces at the start call. Check your balance at translate.bluente.com and top up on pricing.
- File won’t upload. The hosted server caps uploads at 50MB. Anything larger or stubborn: upload it at Bluente Web directly.